Showing posts with label SITE SURVEY. Show all posts

Wednesday, February 12, 2014

Setting Out - Angles

Theodolite - a tripod mounted instrument designed to measure angles in the horizontal or vertical plane.


The theodolite in principle

Measurement - a telescope provides for focal location between instrument and subject. Position of the scope is defined by an index of angles. The scale and presentation of angles varies from traditional micrometer readings to computer compatible crystal displays. Angles are measured in degrees, minutes and seconds, e.g. 165º 53' 30''
.

Direct reading micrometer scale

Application - at least two sightings are taken and the readings averaged. After the first sighting, the horizontal plate is rotated through 180º and the scope also rotated 180 through the vertical to return the instrument to its original alignment for the second reading. This process will move the vertical circle from right face to left face, or vice-versa. It is important to note the readings against the facing † see below.

Thursday, January 30, 2014

Setting Out - Levelling

Levelling ~ the process of establishing height dimensions, relative to a fixed point or datum. Datum is mean sea level, which varies between different countries. For UK purposes this is established at Newlyn in Cornwall, from tide data recorded between May 1915 and April 1921. Relative levels defined by benchmarks are located throughout the country. The most common, identified as carved arrows, can be found cut into walls of stable structures. Reference to Ordnance Survey maps of an area will indicate benchmark positions and their height above sea level, hence the name Ordnance Datum (OD).

On site it is usual to measure levels from a temporary benchmark (TBM), i.e. a manhole cover or other permanent fixture, as an OD may be some distance away.

Instruments consist of a level (tilting or automatic) and a staff. A tilting level is basically a telescope mounted on a tripod for stability. Correcting screws establish accuracy in the horizontal plane by air bubble in a vial and focus is by adjustable lens. Cross hairs of horizontal and vertical lines indicate image sharpness on an extending staff of 3, 4 or 5m length. Staff graduations are in 10mm intervals, with estimates taken to the nearest millimetre. An automatic level is much simpler to use, eliminating the need for manual adjustment. It is approximately levelled by centre bulb bubble. A compensator within the telescope effects fine adjustment.

Setting Out---Levelling

Application ~ methods to determine differences in ground levels for calculation of site excavation volumes and costs.

Setting Out---Levelling

Setting Out Reduced Level Excavations

Setting Out Reduced Level Excavations ~ the overall outline of the reduced level area can be set out using a theodolite, ranging rods, tape and pegs working from a base line. To control the depth of excavation, sight rails are set up at a convenient height and at positions which will enable a traveller to be used.

Setting Out Reduced Level Excavations

Setting Out a Framed Building

Setting Out a Framed Building ~ framed buildings are usually related to a grid, the intersections of the grid lines being the centre point of an isolated or pad foundation. The grid is usually set out from a base line which does not always form part of the grid. Setting out dimensions for locating the grid can either be given on a drawing or they will have to be accurately scaled off a general layout plan. The grid is established using a theodolite and marking the grid line intersections with stout pegs. Once the grid has been set out offset pegs or profiles can be fixed clear of any subsequent excavation work. Control of excavation depth can be by means of a traveller sighted between sight rails or by level and staff related to site datum.

Setting Out a Framed Building

Thursday, January 9, 2014

Setting Out Trenches

Setting Out Trenches ~ the objective of this task is twofold. Firstly it must establish the excavation size, shape and direction and secondly it must establish the width and position of the walls. The outline of building will have been set out and using this outline profile boards can be set up to control the position, width and possibly the depth of the proposed trenches. Profile boards should be set up at least 2„000 clear of trench positions so they do not obstruct the excavation work. The level of the profile crossboard should be related to the site datum and fixed at a convenient height above ground level if a traveller is to be used to control the depth of the trench. Alternatively the trench depth can be controlled using a level and staff related to site datum. The trench width can be marked on the profile with either nails or sawcuts and with a painted band if required for identification.

Setting Out Trenches

NB. Corners of walls transferred from intersecting cord lines to mortar spots on concrete foundations using a spirit level

Tuesday, January 7, 2014

Setting Out the Building Outline

Setting Out the Building Outline ~ this task is usually undertaken once the site has been cleared of any debris or obstructions and any reduced level excavation work is finished. It is usually the responsibility of the contractor to set out the building(s) using the information provided by the designer or architect. Accurate setting out is of paramount importance and should therefore only be carried out by competent persons and all their work thoroughly checked, preferably by different personnel and by a different method.

The first task in setting out the building is to establish a base line to which all the setting out can be related. The base line very often coincides with the building line which is a line, whose position on site is given by the local authority in front of which no development is permitted.

PROTECTION ORDERS FOR TREES AND STRUCTURES

Trees ~ these are part of our national heritage and are also the source of timber - to maintain this source a control over tree felling has been established under the Forestry Act 1967 which places the control responsibility on the Forestry Commission. Local planning authorities also have powers under the Town and Country Planning Act 1990 and the Town and Country Amenities Act 1974 to protect trees by making tree preservation orders. Contravention of such an order can lead to a substantial fine and a compulsion to replace any protected tree which has been removed or destroyed. Trees on building sites which are covered by a tree preservation order should be protected by a suitable fence.


Trees, shrubs, bushes and tree roots which are to be removed from site can usually be grubbed out using hand held tools such as saws, picks and spades. Where whole trees are to be removed for relocation special labour and equipment is required to ensure that the roots, root earth ball and bark are not damaged.

Structures ~ buildings which are considered to be of historic or architectural interest can be protected under the Planning Acts provisions. The Department for Communities and Local Government lists buildings according to age, architectural, historical and/or intrinsic value. It is an offence to demolish or alter a listed building without first obtaining `listed building consent' from the local imprisonment. It is also an offence to demolish a listed building without giving notice to the Royal Commission on Historical

Monuments, this is to enable them to note and record details of the building.

Sunday, January 5, 2014

TIMBER ROT - CAUSES, TREATMENT AND PRESERVATION

Causes -
* Defective construction, e.g. broken roof tiles; no damp-proof course.
* Installation of wet timber during construction, e.g. framing sealed behind plasterboard linings; wet joists under floor decking.
* Lack of ventilation, e.g. blocked air bricks to suspended timber ground floor; condensation in unventilated roof spaces.
* Defective water services, e.g. undetected leaks on internal pipework; blocked or broken rainwater pipes and guttering.

General treatment -
* Remove source of dampness.
* Allow affected area to dry.
* Remove and burn all affected timber and sound timber within 500mm of fungal attack.
* Remove contaminated plaster and rake out adjacent mortar joints to masonry.

Note: This is normally sufficient treatment where wet rot is identified. However, where dry rot is apparent the following additional treatment is necessary:

* Sterilise surface of concrete and masonry.
Heat with a blow torch until the surface is too hot to touch.
Apply a proprietary fungicide† generously to warm surface.
Irrigate badly affected masonry and floors, i.e. provide 12mm
diameter bore holes at about 500mm spacing and flood or
pressure inject with fungicide.

- 20:1 dilution of water and sodium pentachlorophenate, sodium orthophenylphate or mercuric chloride. Product manufacturers' safety in handling and use measures must be observed when applying these chemicals.

Replacement work should ensure that new timbers are pressure impregnated with a preservative. Cement and sand mixes for rendering, plastering and screeds should contain a zinc oxychloride fungicide.

Further reading -
BRE: Timber pack (ref. AP 265) † various Digests, Information
Papers, Good Repair Guides and Good Building Guides.
In-situ timber treatment using timber preservatives † HSE Books.

Ref: Bldg. Regs. Approved Document C, Site preparation and resistance to contaminants and moisture.

Timber Rot - Types

Damp conditions can be the source of many different types of wood-decaying fungi. The principal agencies of decay are -
* Dry rot (Serpula lacrymans or merulius lacrymans), and
* Wet rot (Coniophora cerabella)

Dry rot - this is the most difficult to control as its root system can penetrate damp and porous plaster, brickwork and concrete. It can also remain dormant until damp conditions encourage its growth, even though the original source of dampness is removed.

Appearance - white fungal threads which attract dampness from the air or adjacent materials. The threads develop strands bearing spores or seeds which drift with air movements to settle and germinate on timber having a moisture content exceeding about 25%. Fruiting bodies of a grey or red flat profile may also identify dry rot.

Typical surface appearance of dry rot -


Wet rot - this is limited in its development and must have moisture continually present, e.g. a permanent leaking pipe or a faulty dpc. Growth pattern is similar to dry rot, but spores will not germinate in dry timber.

Appearance - fungal threads of black or dark brown colour. Fruiting bodies may be olive-green or dark brown and these are often the first sign of decay.

Typical surface appearance of wet rot -

Saturday, January 4, 2014

TIMBER SIZES AND SURFACE FINISHES

Structural softwood cross sectional size has established terminology such as, sawn, basic and unwrought as produced by conversion of the log into commercial dimensions, e.g. 100 50mm and 225 75mm (4" X 2" and 9" X 3" respectively, as the nearest imperial sizes).

Timber is converted in imperial and metric sizes depending on its source in the world. Thereafter, standardisation can be undertaken by machine planing the surfaces to produce uniformly compatible and practically convenient dimensions, i.e. 225mm is not the same as 900. Planed timber has been variously described as, nominal, regularised and wrought, e.g. 100 X 50mm sawn becomes 97 X 47mm when planed and is otherwise known as ex. 100 50mm, where ex means out of.

Guidance in BS EN 336 requires the sizes of timber from a supplier to be redefined as `Target Sizes' within the following tolerances:


T1 applies to sawn timber, e.g. 100 X 75mm.
T2 applies to planed timber, e.g. 97 X 72mm.

Further example ~ a section of timber required to be 195mm planed X 50mm sawn is specified as: 195 (T2) 50 (T1).

Target sizes for sawn softwood (T1) ~
50, 63, 75, 100, 125, 150, 175, 200, 225, 250 and 300mm.

Target sizes for planed/machined softwood (T2) ~
47, 60, 72, 97, 120, 145, 170, 195, 220, 245 and 295mm.

Ref. BS EN 336: Structural timber. Sizes, permitted deviations.

CONSTRUCTION - MATERIALS TESTING - SOFTWOOD TIMBER GRADING 2

Fissures and resin pockets ~ defects in growth. Fissures, also known as shakes, are usually caused by separation of annual growth rings. Fissures and resin pockets must be limited in structural timber as they reduce resistance to shear and bending parallel to the grain.


Slope of grain ~ an irregularity in growth or where the log is not cut parallel to the grain. If excessive this will produce a weakness in shear. Measurement is by scoring a line along the grain of the timber surface and comparing this with the parallel sides of the section.

Insect damage ~ no active allowed. Wood-worm holes acceptable if only nominal. Wood wasp holes not permitted.Sapstain ~ acceptable.

Thursday, January 2, 2014

CONSTRUCTION - MATERIALS TESTING - SOFTWOOD TIMBER GRADING 1

Visual strength grading ~ ``process by which a piece of timber can be sorted, by means of visual inspection, into a grade to which characteristic values of strength, stiffness and density may be allocated''. Definition from BS EN 14081-1.

Characteristics:

Knots ~ branch growth from or through the main section of timber weakening the overall structural strength. Measured by comparing the sum of the projected cross sectional knot area with the cross sectional area of the piece of timber. This is known as the knot area ratio (KAR). Knots close to the edge of section have greater structural significance therefore this area is represented as a margin condition at the top and bottom quarter of a section. A margin condition exists when more than half the top or bottom quarter of a section is occupied by knots.
MKAR = Margin knot area ratio.
TKAR = Total knot area ratio.

CONSTRUCTION - MATERIALS TESTING - SOFTWOOD TIMBER CLASSIFICATION

Grading ~ either visually or by computerised machine. Individual rectangular timber sections are assessed against permissible defect limitations and grade marked accordingly.

UK grading standard ~ BS 4978.
European grading standard ~ BS EN 14081 (4 parts).

The two principal grades apart fromrejects are,GS (general structural) and SS (special structural) precededwith anMif graded bymachine.

Additional specification is to BS EN 338: Structural timber.
Strength classes. This standard provides softwood strength classifications from C14 to C40 as well as a separate classification of hardwoods.

A guide to softwood grades with strength classes for timber from the UK, Europe and North America ~


BS EN 338: Structural softwood classifications and typical strength properties ~


CONSTRUCTION - MATERIALS TESTING - SOFTWOOD TIMBER

The quality of softwood timber for structural use depends very much on the environment in which it is grown and the species selected. Timber can be visually strength graded, but this is unlikely to occur at the construction site except for a general examination for obvious handling defects and damage during transit. Site inspection will be to determine that the grading authority's markings on the timber comply with that specified for the application.

Format of strength grade markings on softwood timber for

structural uses ~

MATERIALS TESTING - SOFTWOOD TIMBER


*Accredited certification authorities include

BM TRADA Certification Ltd. and Certification And Timber Grading Ltd. Refs. BS 4978: Visual strength grading of softwood. Specification. BS EN 14081: Timber structures. Strength graded structural timber with rectangular cross section. (In 4 parts).

Tuesday, December 24, 2013

CONSTRUCTION - MATERIALS TESTING - CONCRETE

Non destructive testing of concrete. Also known as in-place or in-situ tests.

Changes over time and in different exposures can be monitored.

References: BS 6089: Guide to assessment of concrete strength in existing structures; BS 1881: Testing concrete. BS EN 13791: Assessment of in-situ compressive strength in structures and pre-cast concrete components.

Provides information on: strength in-situ, voids, flaws, cracks and deterioration.

Rebound hammer test - attributed to Ernst Schmidt after he devised the impact hammer in 1948. It works on the principle of an elastic mass rebounding off a hard surface. Varying surface densities will affect impact and propagation of stress waves. These can be recorded on a numerical scale known as rebound numbers. It has limited application to smooth surfaces of concrete only. False results may occur where there are local variations in the concrete, such as a large piece of aggregate immediately below the impact surface. Rebound numbers can be graphically plotted to correspond with compressive strength.

Ref: BS EN 12504-2: Testing concrete in structures.

SCHMIDT HAMMER

Penetration or Windsor probe test ~ there are various interpretations of this test. It is a measure of the penetration of a steel alloy rod, fired by a predetermined amount of energy into concrete. In principle, the depth of penetration is inversely proportional to the concrete compressive strength. Several recordings are necessary to obtain a fair assessment and some can be discarded particularly where the probe cannot penetrate some dense aggregates. The advantage over the rebound hammer is provision of test results at a greater depth (up to 50mm).

Pull out test ~ this is not entirely non destructive as there will be some surface damage, albeit easily repaired. A number of circular bars of steel with enlarged ends are cast into the concrete as work proceeds. This requires careful planning and location of bars with corresponding voids provided in the formwork. At the appropriate time, the bar and a piece of concrete are pulled out by tension jack. Although the concrete fails in tension and shear, the pull out force can be correlated to the compressive strength of the concrete.

Testing concrete

Ref: BS 1881-207: Testing concrete. Recommendations for the assessment of concrete strength by near-to-surface tests.

Vibration test ~ a number of electronic tests have been devised, which include measurement of ultrasonic pulse velocity through concrete. This applies the principle of recording a pulse at predetermined frequencies over a given distance. The apparatus includes transducers in contact with the concrete, pulse generator, amplifier, and time measurement to digital display circuit. For converting the data to concrete compressive strength, see BS EN 12504-4: Testing concrete. Determination of ultrasonic pulse velocity.

A variation, using resonant frequency, measures vibrations produced at one end of a concrete sample against a receiver or pick up at the other. The driving unit or exciter is activated by a variable frequency oscillator to generate vibrations varying in resonance, depending on the concrete quality. The calculation of compressive strength by conversion of amplified vibration data is by formulae found in BS 1881-209: Testing concrete. Recommendations for the measurement of dynamic modulus of elasticity.

RESONANT FREQUENCY TEST

Other relevant standards:-

BS 1881-122: Testing concrete. Method for determination of water absorption.
BS 1881-124: Testing concrete. Methods for analysis of hardened concrete.
BS EN 12390-7: Testing hardened concrete. Density of hardened concrete.

Monday, December 23, 2013

CONSTRUCTION - MATERIALS TESTING

Site Tests ~ the majority of materials and components arriving on site will conform to the minimum recommendations of the appropriate British Standard and therefore the only tests which need be applied are those of checking quantity received against amount stated on the delivery note, ensuring quality is as ordered and a visual inspection to reject damaged or broken goods. The latter should be recorded on the delivery note and entered in the site records. Certain site tests can however be carried out on some materials to establish specific data such as the moisture content of timber which can be read direct from a moisture meter.

Other simple site tests are given in the various British Standards to ascertain compliance with the recommendations, such as tests for dimensional tolerances and changes given in BS EN 771-1 and BS EN 772-16 which cover random sampling of clay bricks of up to 10 units. An alternative site test can be carried out by measuring a sample of 24 bricks taken at random from a delivered load thus:-


Site Test ~ apart from the test outlined on page 83 site tests on materials which are to be combined to form another material such as concrete can also be tested to establish certain properties which if not known could affect the consistency and/or quality of the final material.

Typical Example ~ Testing Sand for Bulking This data is required when batching concrete by volume † test made at commencement of mixing and if change in weather


Therefore volume of sand should be increased by 21% over that quoted in the specification NB. a given weight of saturated sand will occupy the same space as when dry but more space when damp

Silt Test for Sand ~ the object of this test is to ascertain the cleanliness of sand by establishing the percentage of silt present in a natural sand since too much silt will weaken the concrete


Obtaining Samples for Laboratory Testing ~ these tests may be required for checking aggregate grading by means of a sieve test, checking quality or checking for organic impurities but whatever the reason the sample must be truly representative of the whole:-


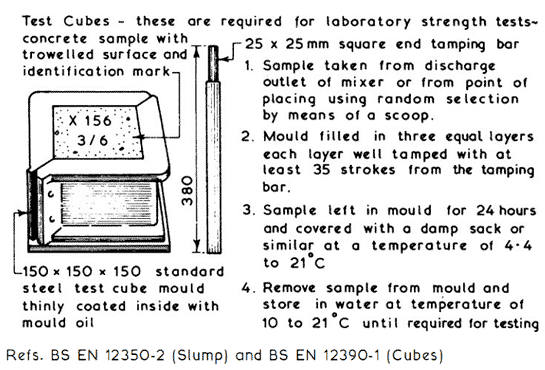
Concrete requires monitoring by means of tests to ensure that subsequent mixes are of the same consistency and this can be carried out on site by means of the slump test and in a laboratory by crushing test cubes to check that the cured concrete has obtained the required designed strength.


The slump cone is filled to a quarter depth and tamped 25 times - filling and tamping is repeated three more times until the cone is full and the top smoothed off. The cone is removed and the slump measured, for consistent mixes the slump should remain the same for all samples tested. Usual specification 50mm or 75mm slump.

CONSTRUCTION - MATERIALS STORAGE

Storage of Materials ~ this can be defined as the provision of adequate space, protection and control for building materials and components held on site during the construction process. The actual requirements for specific items should be familiar to students who have completed studies in construction technology at an introductory level but the need for storage and control of materials held on site can be analysed further:-

1. Physical Properties - size, shape, weight and mode of delivery will assist in determining the safe handling and stacking method(s) to be employed on site, which in turn will enable handling and storage costs to be estimated.
 
2. Organisation - this is the planning process of ensuring that all the materials required are delivered to site at the correct time, in sufficient quantity, of the right quality, the means of unloading is available and that adequate space for storage or stacking has been allocated.

3. Protection - building materials and components can be classified as durable or non-durable, the latter will usually require some form of weather protection to prevent deterioration whilst in store.

4. Security - many building materials have a high resale and/or usage value to persons other than those for whom they were ordered and unless site security is adequate material losses can become unacceptable.

5. Costs - to achieve an economic balance of how much expenditure can be allocated to site storage facilities the following should be taken into account:-

a. Storage areas, fencing, racks, bins, etc.
b. Protection requirements.
c. Handling, transporting and stacking requirements.
d. Salaries and wages of staff involved in storage of materials and components.
e. Heating and/or lighting if required.
f. Allowance for losses due to wastage, deterioration, vandalism and theft.
g. Facilities to be provided for subcontractors.

6. Control - checking quality and quantity of materials at delivery and during storage period, recording delivery and issue of materials and monitoring stock holdings.

Site Storage Space ~ the location and size(s) of space to be allocated for any particular material should be planned by calculating the area(s) required and by taking into account all the relevant factors before selecting the most appropriate position on site in terms of handling, storage and convenience. Failure to carry out this simple planning exercise can result in chaos on site or having on site more materials than there is storage space available.

Calculation of Storage Space Requirements ~ each site will present its own problems since a certain amount of site space must be allocated to the units of accommodation, car parking, circulation and working areas, therefore the amount of space available for materials storage may be limited. The size of the materials or component being ordered must be known together with the proposed method of storage and this may vary between different sites of similar building activities. There are therefore no standard solutions for allocating site storage space and each site must be considered separately to suit its own requirements.

Typical Examples ~

Bricks - quantity = 15,200 to be delivered in strapped packs of 380 bricks per pack each being 1100mm wide X 670mm long X 850mm high. Unloading and stacking to be by forklift truck to form 2 rows 2 packs high.


Areas for other materials stored on site can be calculated using the basic principles contained in the examples above.

Site Allocation for Materials Storage ~ the area and type of storage required can be determined as shown on pages 100 to 102, but the allocation of an actual position on site will depend on:-

1. Space available after areas for units of accommodation have been allocated.
2. Access facilities on site for delivery, vehicles.
3. Relationship of storage area(s) to activity area(s) - the distance between them needs to be kept as short as possible to reduce transportation needs in terms of time and costs to the minimum. Alternatively storage areas and work areas need to be sited within the reach of any static transport plant such as a tower crane.
4. Security - needs to be considered in the context of site operations, vandalism and theft.
5. Stock holding policy - too little storage could result in delays awaiting for materials to be delivered, too much storage can be expensive in terms of weather and security protection requirements apart from the capital used topurchase the materials stored on site.


Bricks ~ may be supplied loose or strapped in unit loads and stored on timber pallets


Drainage Pipes ~ supplied loose or strapped together on timber pallets


Gullies etc., should be stored upside down and supported to remain level

Saturday, December 21, 2013

CONSTRUCTION - SITE STORAGE

Site Storage ~ materials stored on site prior to being used or fixed may require protection for security reasons or against the adverse effects which can be caused by exposure to the elements.

Small and Valuable Items ~ these should be kept in a secure and lockable store. Similar items should be stored together in a rack or bin system and only issued against an authorised requisition.

Large or Bulk Storage Items ~ for security protection these items can be stored within a lockable fenced compound. The form of fencing chosen may give visual security by being of an open nature but these are generally easier to climb than the close boarded type of fence which lacks the visual security property.

Typical Storage Compound Fencing ~

Close boarded fences can be constructed on the same methods used for hoardings - see pages 92 & 93.

Alternative Fence Types ~ woven wire fence, strained wire fence, cleft chestnut pale fence, wooden palisade fence, wooden post and rail fence and metal fences † see BS 1722: Fences, for details.

CONSTRUCTION - SITE HEALTH AND WELFARE REQUIREMENTS

The requirements for health and wellbeing of persons on construction sites are enforced by the Health and Safety Executive, through the Health and Safety at Work etc. Act 1974 and the Construction (Health, Safety and Welfare) Regulations 1996. The following minimum requirements apply and the numbers of persons on sitewere established by theConstructionRegulations of 1966.

CONSTRUCTION - SITE OFFICE ACCOMMODATION

Office Accommodation ~ the arrangements for office accommodation to be provided on site is a matter of choice for each individual contractor. Generally separate offices would be provided for site agent, clerk of works, administrative staff, site surveyors and sales staff.

The minimum requirements of such accommodation is governed by the Offices, Shops and Railway Premises Act 1963 unless they are ~

1 . Mobile units in use for not more then 6 months.
2. Fixed units in use for not more than 6 weeks.
3. Any type of unit in use for not more than 21 man hours per week.
4. Office for exclusive use of self employed person.
5. Office used by family only staff.

Sizing Example ~

Office for site agent and assistant plus an allowance for 3 visitors.
Assume an internal average height of 2.400.
Allow 3.7m2 minimum per person and 11.5m3 minimum per person.
Minimum area = 5 3.7 = 18.5m2
Minimum volume = 5 11.5 = 57.5m3
Assume office width of 3.000 then minimum length required is


Typical Example ~

Portable cabin with four adjustable steel legs with attachments for stacking. Panelling of galvanised steel sheet and rigid insulation core. Plasterboard inner lining to walls and ceiling. Pyro-shield windows with steel shutters and a high security steel door.

Ref. Fire prevention on construction sites † the joint code of practice on protection from fire of construction sites and buildings undergoing renovation. Published by Construction Confederation and The Fire Protection Association.